
We’re following reports that Microsoft Flight Simulators recent patch – 1.10.7.0 – causes liveries to stop working properly. In most cases, users complain that they cannot select a livery in the hangar or that the selected livery is not saved when clicked. We already posted a workaround here, which is a temporary solution to get liveries loaded. In case you just wish to do some quick flights, we recommend using the workaround linked above and wait until the livery gets updated.
For Creators
The following guide is the final solution how to make all liveries work again. However, this needs to be done for every livery. If you’re a livery creator, we ask that you update your livery accordingly and to update it on Flightsim.to, so that everyone can use it again. If you are not a creator, you have to wait for an update of the respective livery, or you can make the changes yourself. Please always take backups before making changes.
Getting started
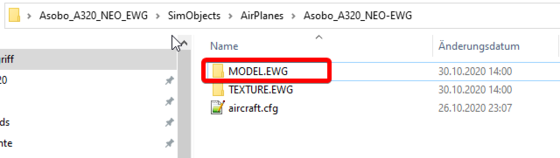
Here is how a livery inside your Community folder is currently structured. What are we going to do? We will create a model folder with a model.cfg in it. Then we will need to change the aircraft.cfg and layout.json file – that’s it. We will use A320 NEO for this example, however, it should work with other aircraft as well. Just make sure to replace the folder names accordingly.

Besides your already existing TEXTURE.LIVERY folder, where your DDS textures are located in, we will create a MODEL.LIVERY folder. So if your texture is called TEXTURE.EWG like above – for Eurowings -, we will need to add a MODEL.EWG folder. Right-Click and create a new folder, name it “MODEL.LIVERY“, remember to rename it accordingly to your livery.
Inside that just created MODEL.LIVERY folder create a model.cfg file, which contains the following contents. Notice that all values are set to TRUE and notice the interior XML path. In previous model files, which were meant to be used for Air Traffic, the value for “normal” was linked to model.AirTraffic, while it’s now linked to model. You don’t need to change anything in that code below. This will be your model.cfg for A320 NEO liveries:
[model.options]
withExterior_showInterior=TRUE
withExterior_showInterior_hideFirstLod=TRUE
withInterior_forceFirstLod=TRUE
withInterior_showExterior=TRUE

[models]
normal=../../Asobo_A320_NEO/model/A320_NEO.xml
interior=../../Asobo_A320_NEO/model/A320_NEO_INTERIOR.xml
In case you want to modify a Boeing 787 livery, the model.cfg will be this:
[model.options]
withExterior_showInterior=TRUE
withExterior_showInterior_hideFirstLod=TRUE
withInterior_forceFirstLod=TRUE
withInterior_showExterior=TRUE

[models]
exterior=../../Asobo_B787_10/model/B787.xml
interior=../../Asobo_B787_10/model/B787_10_interior.xml
In case you want to modify a Boeing 747 livery, the model.cfg will be this:
[model.options]
withExterior_showInterior=TRUE
withExterior_showInterior_hideFirstLod=TRUE
withInterior_forceFirstLod=TRUE
withInterior_showExterior=TRUE

[models]
exterior=../../Asobo_B747_8i/model/747_8I.xml
interior=../../Asobo_B747_8i/model/747_8I_INTERIOR.xml
Update your layout.json
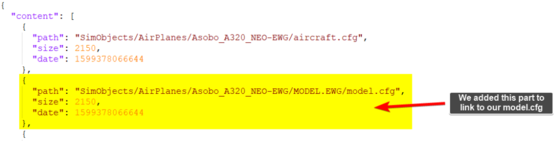
In your livery’s layout.json file, add the following contents right below the entry for the already existing aircraft.cfg and link the path to your model.cfg created inside the model folder. Remember to replace LIVERY with you liverys name and adjust the folder names in general. So here is for example, how the beginning of your layout.json file for the Eurowings livery would look like.
{
      "path": "SimObjects/AirPlanes/Asobo_A320_NEO_LIVERY/MODEL.LIVERY/model.cfg",
      "size": 1,
      "date": 132400215225729553
}, 
Update your aircraft.cfg
Finally, in your aircraft.cfg make sure to put the name of the model in for [FLTSIM.0]. In previous liveries, it’s much likely that it has no value. So for our just created MODEL.EWG folder this will be “EWG” and this is how your aircraft.cfg should look like now:
[FLTSIM.0]
title = "Airbus A320 Eurowings" ; Variation name
model = "EWG" ; model folder <-----
panel = "" ; panel folder
[...]
That’s it. Save and restart your sim
Once you saved everything and restarted the game, you will now be able to select the “broken” livery again. So here is the quick overview of all necessary steps again.
- Create a MODEL.LIVERY folder.
- Put the model.cfg inside that folder.
- Link to that file within your aircraft.cfg and layout.json files.
- Save and restart your game! You can now select the livery again.
And what about AirTraffic models?
You may also create a folder named model.LIVERY_AI to enable Air Traffic support for your livery. In this case, just repeat the steps above, so you will have a folder named MODEL.LIVERY for the actual plane and a MODEL.LIVERY_AI for the Air Traffic model. Pay attention that the model.cfg will look different for AI traffic, it will have no interior entry and has to be linked to folder model.AirTraffic. Finally, in your aircraft.cfg a [FLTSIM.1] is required, with isAirTraffic = 1 and proper link to your AI folder.
Thanks to MikeFear303 for investigating this solution.